How to Find a Roof Leak: A Step-by-Step Guide for Melbourne Homeowners

How to find a roof leak

Quick Overview:

How to find a roof leak is one of the most common questions Melbourne homeowners ask after a heavy downpour or cold front. The key thing to understand is that the water stain on your ceiling is rarely directly beneath where the leak actually enters. Water travels along rafters and battens before dripping down, sometimes metres away from the entry point. Finding a roof leak involves checking inside first, inspecting the roof cavity if accessible, then examining the exterior for damaged tiles, cracked flashing, blocked valleys, and failed repointing. This guide walks through every step, including the most common leak sources on Melbourne tiled roofs and when a professional inspection is the right call.

If you’ve noticed a water stain on your ceiling after rain, a damp smell in the ceiling cavity, or an actual drip somewhere in your home, you already know you have a problem. The hard part is figuring out exactly where how to find a roof leak starts, because water is deceptive. It enters your roof at one point and can travel a long way before it shows up inside your home.

Melbourne’s northern suburbs see some of the harshest roofing conditions in Victoria. Cold winter fronts, hail events, heavy autumn rain, and decades-old tile roofs all contribute to a higher-than-average rate of roof leaks in homes across Coburg, Reservoir, Pascoe Vale, Preston, Essendon, and surrounding suburbs. Knowing how to identify a leak early can save you thousands in internal damage repairs.

Close-up of a water-stained ceiling with visible brown discolouration and a damp patch spreading from a corner, interior home setting

Why Finding a Roof Leak Is Trickier Than It Looks

Here is the most important thing to understand before you start looking: the wet spot on your ceiling is almost never directly below where the water enters.

Water gets in through a gap in your roof surface, then travels along rafters, battens, sarking, or insulation. It follows the path of least resistance until it finds somewhere to pool, then drips down. That entry point could be half a metre or several metres away from where you see the damage inside.

This is why the leak you’re hunting for isn’t always where you think it is. A stain near your light fitting in the hallway might actually be caused by a cracked tile above the bedroom. Understanding this from the start stops you wasting time looking in the wrong place.

Step 1: Start Your Inspection Inside

Before you go anywhere near a ladder, walk through your home and look for every sign of water intrusion. You’re gathering clues, not solving the mystery yet.

What to look for inside:

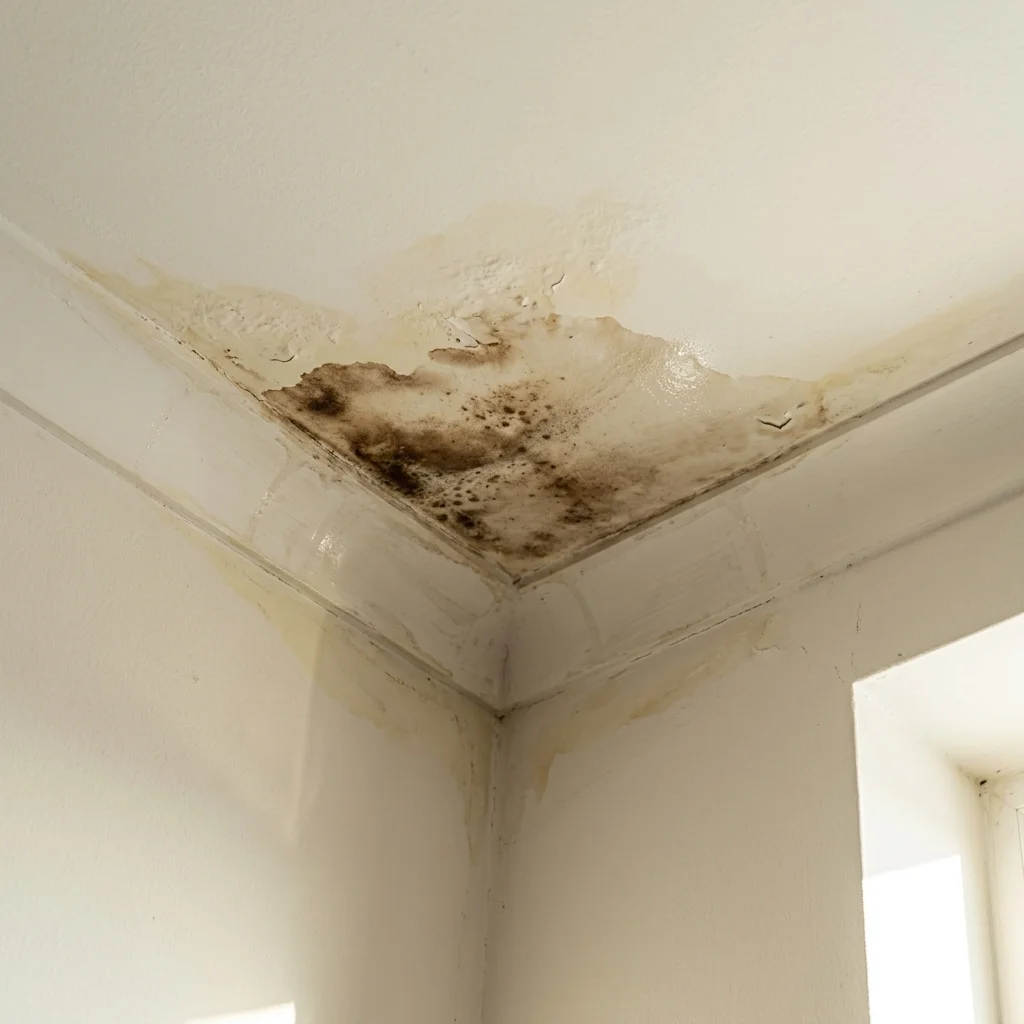
  • Brown or yellow water stains on ceilings or walls
  • Bubbling, peeling, or blistering paint on ceilings
  • Dark patches or mould growth along ceiling edges or in corners
  • A musty smell in specific rooms, particularly after rain
  • Sagging or soft spots in the plasterboard ceiling
  • Damp patches appearing only during or after rain (versus condensation, which appears regardless of weather)

Mark everything you find. Take photos and note the location of each sign. These data points will help you and any roofing professional narrow down where on the roof to look.

If your ceiling feels soft or is visibly bulging in one spot, do not poke it without being prepared for a significant amount of water to come down. Place a bucket below and have towels ready before you do anything further.

Step 2: Inspect the Roof Cavity if You Can Access It Safely

If your home has accessible roof space, this is often where you get the clearest picture of what is happening. Wait for rain if you can, or go up after a recent rainfall when surfaces are still damp.

What to look for in the roof cavity:

  • Wet insulation batts or damp, flattened insulation
  • Water stains or dark marks running along timber rafters or battens
  • Mould or mildew on timber members
  • Actual dripping or pooled water on the sarking
  • Daylight visible through gaps in the roof surface (do this check during the day with lights off)

Use a torch and follow any wet trails backward, upward and toward the ridge. The water trail will lead you closer to the actual entry point. Mark the spot from above and compare it to where it sits on the exterior of the roof.

Safety note: Never step on the ceiling plasterboard. Walk only on the timber joists. If the space is too confined or you are not comfortable, stop and call a professional for a proper roof inspection in Melbourne.

Not comfortable getting up there yourself? A professional roof assessment from Melbourne’s northern suburbs roofing specialists gives you a complete picture safely and quickly.

Step 3: Examine the Roof Exterior from the Ground

Before climbing onto the roof, do a thorough ground-level inspection with binoculars if you have them. You can identify a significant number of leak sources without setting foot on the roof at all.

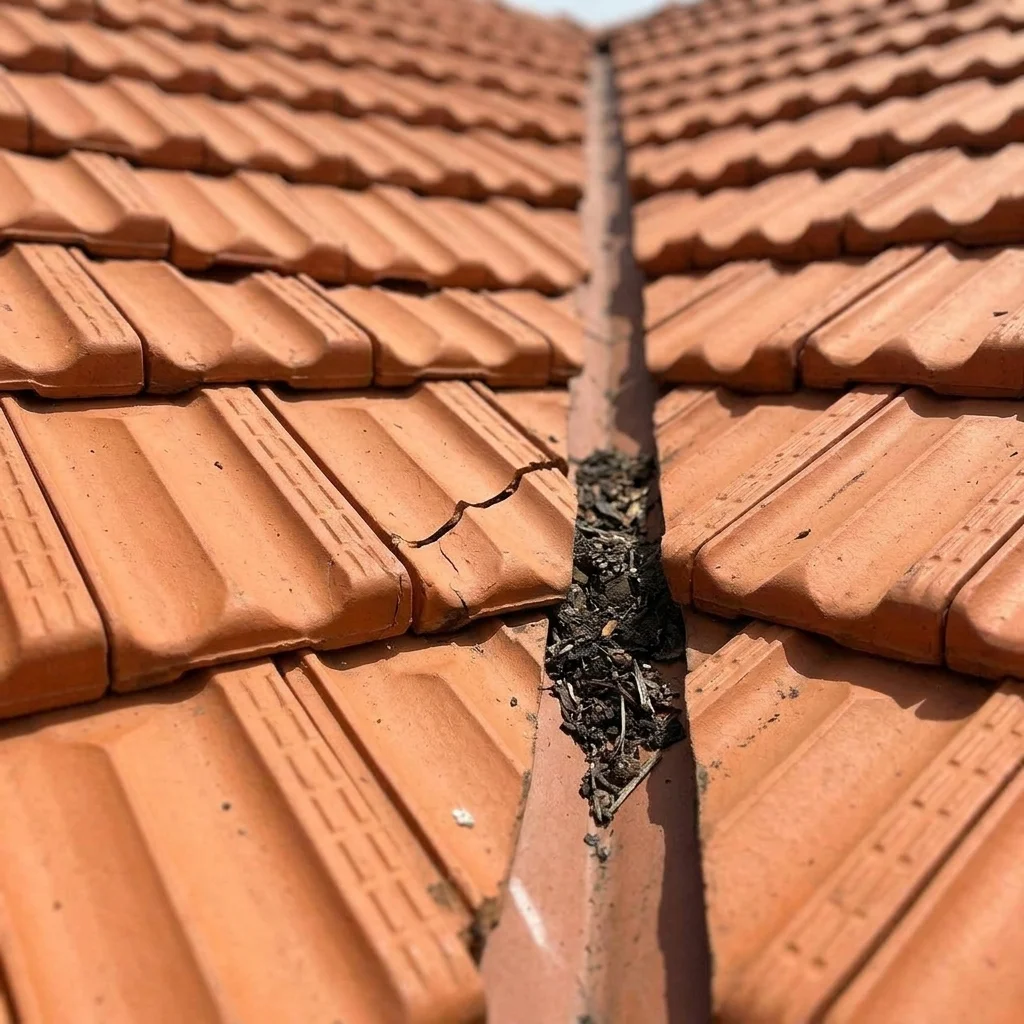
Common external leak sources on Melbourne tiled roofs:

Leak SourceWhat to Look ForHow Serious
Cracked or broken roof tilesVisible cracks, chips, or missing tilesHigh: immediate repair needed
Failed ridge capping / repointingCrumbling mortar, gaps along the ridge lineHigh: very common on older Melbourne roofs
Roof valley blockage or damageDebris build-up, rust, or bent valley ironHigh: valleys carry large volumes of water
Cracked or lifted flashingMetal pulling away from chimney, skylights, ventsHigh: the most common single cause of leaks
Blocked gutters and downpipesOverflowing gutters, debris visible from groundMedium: causes water to back up under tiles
Sagging or displaced tilesTiles sitting unevenly or noticeably lowerMedium: creates gaps for water entry

Flashing failure is the single most common cause of roof leaks in Melbourne homes. The metal or polymer seals around chimneys, skylights, vents, and where roof sections meet walls deteriorate over time and eventually allow water in. A professional flashing repair is often what resolves a leak that seems impossible to trace.

Failed ridge capping mortar is the second most common culprit, particularly on homes built before the 1990s across Melbourne’s northern suburbs. Roof repointing and rebedding addresses this directly and is one of the most cost-effective repairs available for tiled roofs.

Step 4: The Garden Hose Test

If you still cannot identify the source after the above steps, the garden hose test is your next tool. This works best with two people, one on the roof and one inside watching the ceiling.

How to do it safely:

  1. Start at the lowest section of the roof, directly above where you saw the indoor signs.
  2. Run the hose slowly over a small section for at least five minutes before moving on.
  3. The person inside calls out when water appears on the ceiling or in the cavity.
  4. Work your way upward from section to section until you isolate the area.
  5. Mark the location precisely from the outside.

Never do this on a wet roof. This test is for dry conditions only. Also note that this method may not work for leaks that only occur during wind-driven rain from a specific direction, as these require wind and rain simultaneously to reproduce.

Exterior view of a Melbourne tiled roof showing cracked mortar along the ridge capping and lifted tiles near the valley, overcast sky

What to Do While You Wait for a Professional

If it is raining and you have an active leak, here are the immediate steps to take while you arrange a proper repair:

  • Place buckets or containers to catch dripping water
  • Move any furniture, electronics, or valuables away from the affected area
  • If the ceiling is visibly sagging or bulging, gently pierce the lowest point to release water into a bucket, preventing a full ceiling collapse
  • If the leak is severe and related to storm damage, contact a roofing service that handles emergency roof repairs in Melbourne
  • Document everything with photos for any insurance claim you may need to make

Read more about how roof leaks affect your home if left unaddressed, including the damage to insulation, plasterboard, and structural timbers that builds up over time.

“The biggest mistake Melbourne homeowners make is assuming the leak is directly above the water stain. Nine times out of ten, it’s not. Water travels through roof cavities in ways that surprise even experienced roofers. That’s why a systematic approach, checking from the inside out, always works better than guessing.”

Roofing Specialist, Roof Restoration Northern Suburbs, Melbourne

How to Find a Roof Leak

A step-by-step guide for Melbourne homeowners

Step 01

👁

Spot the Signs Inside

Start in your living areas. Water stains and damp patches are your first clues. The leak entry point is often metres away from where the water appears inside.

Ceiling Stains Damp Patches Mould Growth Musty Smell Peeling Paint

Step 02

🔦

Check the Roof Cavity

If you can access your roof space safely, go up after recent rainfall. Follow any wet trails backward and upward toward the ridge to trace the source.

Wet Rafters Daylight Through Gaps Damp Insulation Mould on Timber

Step 03

🏠

Inspect Exterior from the Ground

Before climbing onto the roof, do a thorough ground-level check. Use binoculars if you have them. Many leak sources are visible without leaving the ground.

📷 Roof Tiles

Cracked, broken or missing

⚿ Flashing

Lifted or cracked at joins

🏗 Ridge Capping

Crumbling mortar along ridge

🌊 Valley and Gutters

Blocked, rusted or damaged

Step 04

💧

The Garden Hose Test

Two people needed. One on the roof with the hose, one inside watching the ceiling. Work low to high, spending at least 5 minutes on each section before moving up.

Start Low

Begin at eaves level

Wait 5 Mins

Per section before moving

Work Upward

Toward ridge until found

Step 05

🔍

Identify the Source

Using the clues gathered from all previous steps, pinpoint the most likely entry point. Mark it clearly from the outside. Cross-reference with what you found in the roof cavity.

Compare Inside Clues Mark the Location Check Above and Around It

Result

🔧

Call a Professional for Repair

Once the source is identified, or if you cannot find it after all steps, a professional roof repair and restoration service will diagnose and fix the problem safely and permanently.

Safe Repair

🔒

Lasting Fix

📈

No More Damage

Roof repair and restoration specialists serving Melbourne's northern suburbs

Roof Restoration Northern Suburbs  |  roofrestorationnorthernsuburbs.com.au

When to Stop Looking and Call a Professional

Some leaks are straightforward to locate. Others are genuinely difficult, even for experienced roofers. Stop the DIY investigation and call a professional when:

  • You cannot locate the source after a thorough inspection
  • The leak only happens during wind-driven rain from one direction
  • There is widespread moisture, mould, or wet insulation across the roof cavity
  • The roof is steep, fragile, or high, where safe access is not possible without proper equipment
  • The leak is severe or getting worse with each rainfall
  • You can see multiple signs of roof damage beyond a single isolated area

A roof repair and restoration service covering Melbourne’s northern suburbs can assess the full picture, including areas that are not visible from the ground or through a basic attic inspection. They carry the right equipment, insurance, and experience to work safely at height and diagnose complex leak paths accurately.

If your tiles need repair after the source is found, a professional tile repair service will restore the integrity of the roof properly. If the valley is the culprit, a roof valley replacement may be the correct fix. And if blocked gutters are contributing, a professional gutter clean removes the debris causing water to back up under the tiles.

Frequently Asked Questions

  • Q1. Why is my roof leaking but I can't see any damage?

    This is very common. The most frequent hidden causes are failed flashing around vents or skylights, cracked mortar along the ridge capping that is only visible up close, or a hairline crack in a tile that looks fine from a distance.professional roof inspection uses a close-up assessment from the roof surface itself, which reveals damage that ground-level checks miss entirely.

  • Q2. Why does my roof only leak in heavy rain and not light rain?

    Small gaps or cracks that allow water in under heavy rainfall may not allow enough water through during light rain to be noticeable. Failed valley iron, slightly lifted tiles, or partially crumbled ridge mortar behave this way. The volume of water in a heavy downpour overcomes the marginal seal that works in lighter conditions. This type of intermittent leak still needs repair because the damage accumulates with every heavy rain event.

  • Q3. How do I know if my roof leak is caused by the gutters or the tiles?

    Gutter-related leaks typically show up at the eaves or along the top of the interior walls rather than in the centre of a ceiling. If water appears directly below a valley, ridge, or roof penetration like a skylight or vent, the source is more likely to be in the tile surface or flashing. A visual check of your gutters after rain to see if they are overflowing will help confirm or rule out gutter involvement.

  • Q4. Can a small roof leak fix itself?

    No. Roof leaks do not resolve on their own. A crack or gap that lets in a small amount of water will widen over time due to thermal expansion and contraction, further weathering, and the freeze-thaw cycles Melbourne experiences in winter. Addressing a small leak early costs significantly less than dealing with the internal damage caused by leaving it. Read more about identifying roof damage early before it becomes a major repair.

  • Q5. How much does it cost to fix a roof leak in Melbourne?

    Repair costs vary significantly depending on the cause. A simple repointing repair costs less than replacing valley iron or reflashing around a chimney. The only way to get an accurate figure is with an on-roof assessment of the actual damage. A roof repair and restoration service in Melbourne's northern suburbs can provide a free quote after inspection, giving you a clear picture of what is needed and why before any work begins.

Take Action Before the Problem Gets Worse

Hail damage to your roof does not get better with time. Every Melbourne spring brings hailstorms, strong winds and temperature swings that accelerate the deterioration of cracked tiles and dented metal roofing. Every month you wait, the risk of water leaks, mould growth and structural damage increases.

The good news is that repairing hail damage in Melbourne’s northern suburbs is a well-managed, straightforward process when you work with the right team. The result is a protected roof, better water protection, improved structural integrity and complete peace of mind.

Get your roof assessed today. The hail damage roof repair specialists serving Melbourne’s northern suburbs are ready to help. Contact Roof Restoration Northern Suburbs for a professional hail damage inspection.

Get your roof assessed today. The hail damage roof repair specialists serving Melbourne’s northern suburbs are ready to help. Contact Roof Restoration Northern Suburbs for a professional hail damage inspection.

Contact us today for a free, no‑obligation roof assessment and quote.

If you want a thorough and safe roof cleaning, don’t hesitate to reach out to us for expert services. We can handle everything from roof cleaning to roof restoration.

Roof Restoration Northern Suburbs is the fastest, quickest way to find the roofing experts at your doorstep. In one simple call, you can access the skills and expertise you need.
Reviews google